It can be difficult for small businesses to decide what solution they want to use for managing their endpoint devices. Active Directory Domains are pricey and require a certain degree of technical expertise and experience to setup and manage. Cloud based Mobile Device Management platforms are powerful and pretty straightforward to configure, but the cost may be tough to justify if your business network only uses a handful of desktop machines that never leave the facilities.
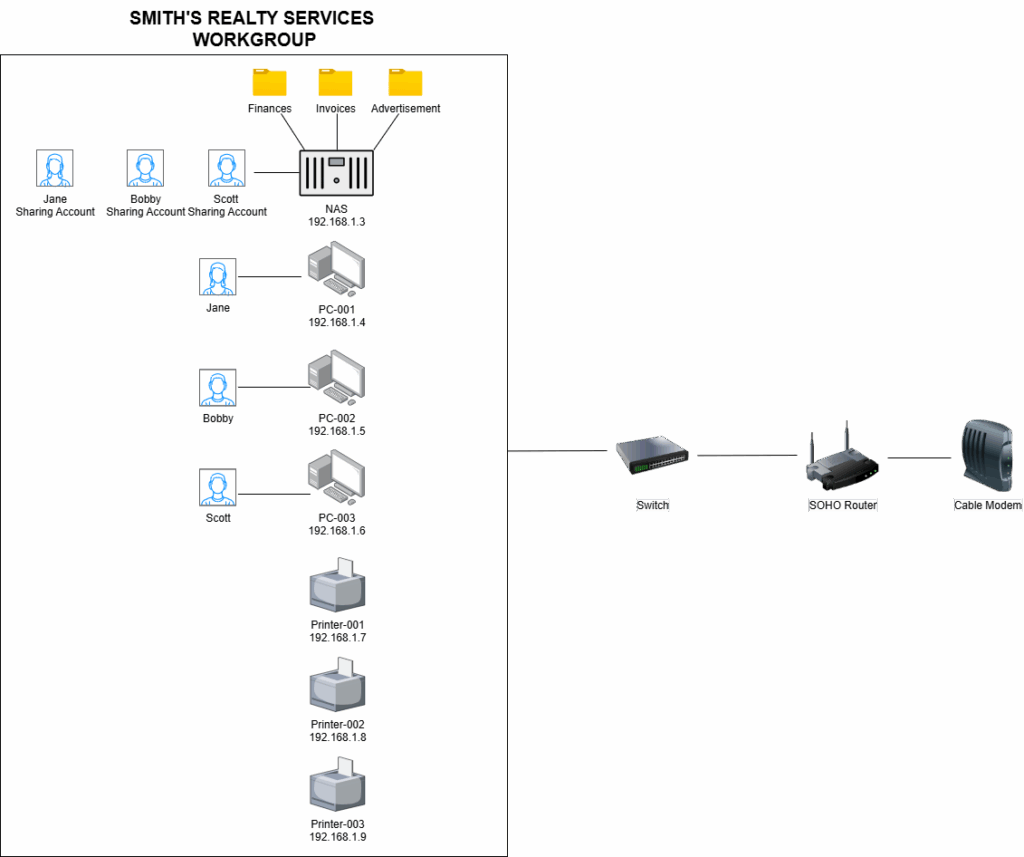
If your business is made up of less than ten workstations that stay dormant inside your facilities, the best option for network organization may be to setup a simple old fashioned Windows Workgroup. A workgroup is a logical collection of workstations on a LAN that share common resources and responsibilities. It is the most basic network setup you can implement for your machines. Computers that are organized in a workgroup can share printers, files, and even Internet connections. This allows for a degree of visibility and collaboration between devices even though they are not logically organized together in any sort of organizational unit like in an Active Directory Domain.
To setup a Windows Workgroup, you start by ensuring that all PCs on your LAN are properly imaged, configured, and connected to the same network segment. Since there is no centralized security management tool like Active Directory or Mobile Device Management, you have to go to each computer one by one and configure settings individually. Even with a few computers, this is pretty inconvenient and time consuming. Luckily there are tools that speed up this process. You can configure a Provisioning Package with Windows Configuration Designer to apply software packages, naming schemes, and wireless network connections to your devices. You can then use a Local Group Policy template to apply universal, granular security settings on each computer with just a few commands. This framework offers a pre-configured LGPO template available for free. The template's settings are configured in compliance with CIS Benchmarks and the Microsoft Security Compliance Toolkit, ensuring that system security meets industry standards even in decentralized environments.
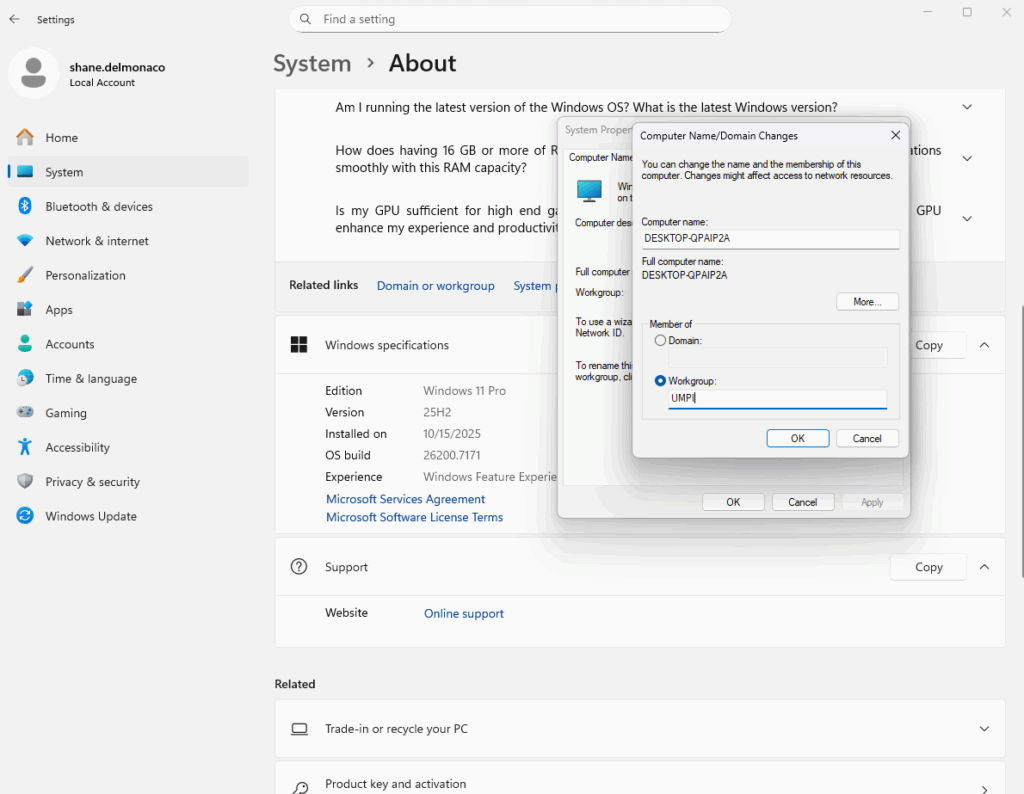
Once every system on your network is configured to your liking, you can add them all to a workgroup in the System settings snap in. This is reached via Settings -> Domain or workgroup -> Change. Workgroup should be highlighted by default, but you do need to type in the name for your workgroup. This name will be applied universally across every system you want to include in the workgroup.
Once you have added all of your workstations to the desired workgroup, you can move on to configuring resource sharing between them. The appeal of a workgroup is that employees can have a small community of printers, computers, and files that are shared between each of them. This is great for highly collaborative environments that require data to be viewed and modified different employees. However to make files and printers available over the network, you need to start by enabling Network Discovery. To do this visit Control Panel -> Network and Internet -> Network and Sharing Center -> Change Advanced Sharing Settings, then turn on Network Discovery and File & Printer Sharing.

To share printers and files, follow the paths specified below:
- Printers: Settings -> Bluetooth and devices -> Printers and Scanners -> select your printer -> Printer Properties -> Sharing Tab -> Share this printer.
- Files/Folders: Right click file of choice -> 'Show More Options' -> 'Give access to' -> 'Specific people' then choose users to share with
There is an inconvenient issue that arises with sharing resources in a workgroup. For users to be able to access resources on each other's computers over the network, they need to have individual user accounts set up on each other's device with identical usernames and passwords. This means that for the workgroup to function properly, the administrator will need to create a copy of every user account on every computer and find a way to get each user's unique password on each one. Not only is this inconvenient to setup, but what will happen when passwords expire and users have to choose a new one? The administrator will then need to get the new password synced across each computer.
You can start to see why a workgroup isn't the most conventional network structure, and why it would be a nightmare in an organization with more than a few employees. There is a way to make file sharing a bit easier in a workgroup deployment, and that is by using a dedicated Network Attached Storage Device. By deploying a NAS on the LAN, you can configure the NAS to function as a mini domain controller, but specifically for file sharing. After connecting the NAS and assigning it with a Static IP Address, you can create file shares that employees can store files in as needed. For security and organization, try to be very specific with the names of folders and the data they store, rather than creating big unnamed folders holding dis-organized blobs of data. One the file shares are created, you can mount them on each employee workstation so that they appear as a continuous secondary hard drive. When employees want to share files/folders, they follow the normal process specified above, only the data is stored and shared on the NAS rather than their local workstation. Each employee will need a dedicated user account on the NAS operating system itself. The NAS accounts can hold the same password as their local Windows account, or for even better security, they can have a separate passwords distinguishing them from the Windows accounts. Is this a good precaution to have to slow down lateral movement if a threat actor compromises either the NAS account or the Windows account. Since file sharing is done through the NAS, there is no need to share files from the workgroup computers themselves and thus no need to create many different user accounts on each computer.